The Complete Farmers Market Booth Setup Guide: From Beginner to Brand
Transform your farmers market booth from beginner to established brand with this complete setup guide. Discover proven booth layout strategies, visual merchandising techniques, and professional branding solutions on any budget. Learn the 3-zone display method, avoid common vendor mistakes, and create a memorable booth that stops customers in their tracks. Includes equipment checklists, DIY display ideas, color psychology tips, and pre-market preparation guides. Perfect for craft fair vendors, small business owners, bakers, makers, and first-time market sellers looking to stand out and increase sales at outdoor markets and vendor events.
Jess
11/3/202512 min read

The Complete Farmers Market Booth Setup Guide: From Beginner to Brand
Your products are amazing. Your booth setup? Not so much. Here's how to transform your folding table into a professional vendor presence that attracts customers and increases sales.
You show up to your first farmers market with your carefully crafted products, a folding table, and high hopes.
Then you see the vendor next to you: matching signage, beautiful displays, a line of customers waiting. Meanwhile, people are walking right past your booth without a second glance.
Here's what nobody tells you: At farmers markets, your booth IS your storefront. And just like a brick-and-mortar shop, you have about 3 seconds to make a first impression that either draws customers in or sends them walking.
The good news? You don't need years of experience or a massive budget to create a booth that stands out. You just need to understand a few key principles of layout, branding, and visual design.
This guide will take you from farmers market beginner to established brand—with practical, actionable steps you can implement before your very next market.
Before You Start: The Quick Essentials Checklist
Before we dive into booth design, make sure you have these non-negotiables:
Must-Haves for Your First Market:
10x10 canopy tent (or confirmed market provides tables/tents)
Tent weights if not included (40-50 lbs minimum—wind is your enemy)
1-2 folding tables (6ft or 8ft)
Cash box with $100-150 in change
Business cards (minimum 100)
Basic packaging/bags for purchases
Weather emergency kit (bungee cords, zip ties, towels)
Got those covered? Great. Now let's talk about what actually sells.
Section 1: Planning Your Booth Layout That Sells
The way you arrange your booth space isn't just about aesthetics—it's about psychology and customer behavior.
The Open vs. Closed Booth Mistake
The Biggest Beginner Mistake:
❌ The Fortress Layout
Tables form a solid wall across the front
Vendor stands behind like they're working a concession stand
Customers feel like they're interrupting if they approach
Creates a psychological barrier
✓ The Welcoming Layout
Tables positioned at angles or on the sides
Vendor can step forward to greet customers
Products visible from multiple approach angles
Customers feel invited to browse
Why this matters: Customers make split-second decisions. An open layout can increase foot traffic by 30-40%.
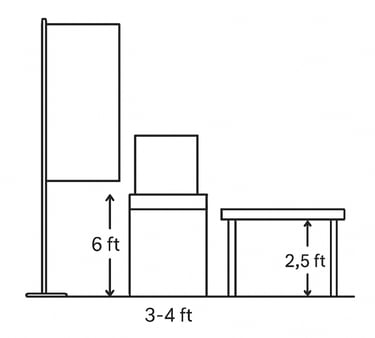
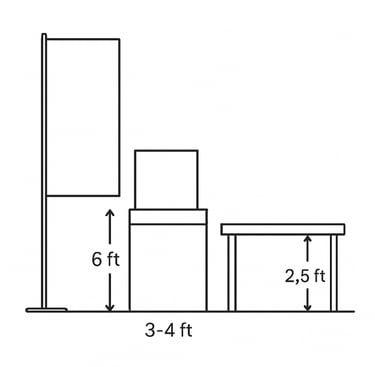
The Three-Zone Method
Divide your 10x10 space into three functional zones:
Zone 1: The Magnet Zone (Front 3 feet)
Your eye-catching bestsellers
Clear, visible pricing
Products customers can quickly grab
Your main business sign positioned high (5-7 feet)
Zone 2: The Browsing Zone (Middle 4 feet)
Main product displays at waist-to-eye level
Space for customer-vendor conversation
Product variety and options
Where sales conversations happen
Zone 3: The Hidden Zone (Back 3 feet + under tables)
Backup inventory (concealed with table skirts)
Personal items and supplies
Cash box and extra bags
Never visible to customers
Traffic Flow Secrets
Corner booth vs. inline booth strategy:
If you have a corner booth:
Create an L-shaped or U-shaped layout
Display products on both open sides
Use the back corner for storage
Position yourself in the middle to greet from both directions
If you have an inline booth:
Focus ALL visual interest on the front
Use height to stand out (more on this next)
Make your side views attractive (people approach at angles)
Position yourself slightly to one side, not blocking center
The 3-Second Rule
Customers decide whether to approach your booth in 3 seconds or less.
They're unconsciously asking:
What are you selling? (Must be instantly clear)
Does it look professional?
Can I see prices?
Does the vendor look friendly?
Design every element with the 3-second rule in mind.
Setting Up Your Layout: Step-by-Step
Setup order matters for efficiency:
Secure tent first - Set up and weight immediately (don't wait)
Position tables - Create your open layout before adding products
Add table coverings - This is where branding starts
Main signage - Get your business name visible
Display products - Work from back to front
Final touches - Price signs, business cards, tidy up
Pro tip: Practice your setup at home and time yourself. Most vendors take 45-60 minutes initially, but you can get it down to 20-30 minutes with practice.
Product Plug: Table Runners & Coverings
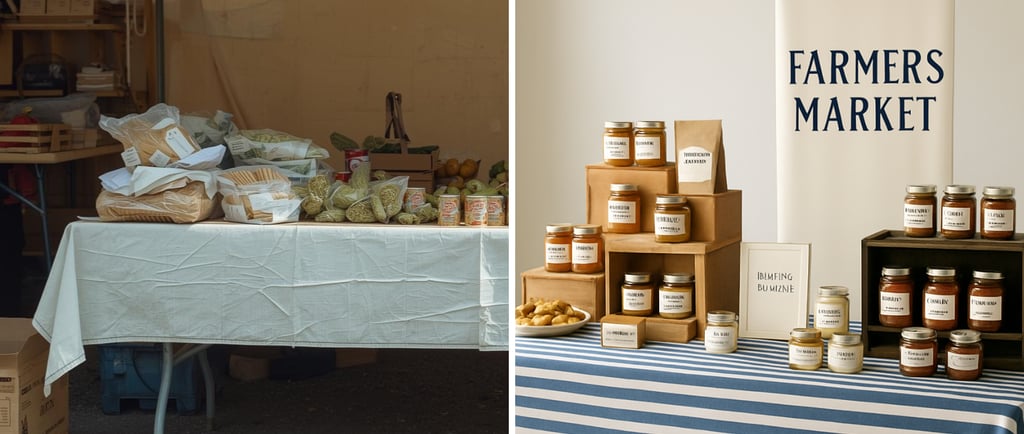
Your table covering is the foundation of your entire visual brand.
Skip the:
Wrinkled bedsheet from home
Random tablecloth that doesn't match anything
Bare folding tables (looks unprofessional)
Instead: A branded table runner immediately elevates your booth and creates cohesion across your entire setup. When customers see your colors and style from across the market, recognition builds fast.
💡 Shop branded table runners: French Stripe Collection | Modern Minimalist | Artisan Neutrals
Styling tip: Use a neutral tablecloth as your base, then layer a branded table runner down the center. This creates visual interest while keeping costs manageable.
Section 2: Creating Visual Height & Interest
Flat displays are forgettable. Dimension catches the eye.
Why Height Matters
The visibility problem: When every vendor has products on flat tables at the same height, everything blends together. The booth with vertical interest stands out instantly.
Think of your booth in three vertical levels:
High Level (5-7 feet) - Visible from a distance
Your main business sign/banner
Hanging products (if applicable)
Backdrop banners
Purpose: Attracts attention from 20+ feet away
Middle Level (2.5-5 feet) - Eye level browsing
Primary product displays
Main sales interaction happens here
Product information and storytelling
Purpose: Where customers actually shop
Low Level (table height & below) - Supporting elements
Bulk items or lower-priced products
Concealed storage (with table skirts)
Baskets of sale items
Purpose: Fills space without cluttering
Budget-Friendly Height Solutions
You don't need expensive display fixtures:
DIY Height Options:
Wooden crates ($10-15 each) - Turn on sides, stack them
Cake stands ($8-20) - Create tiers on tables
Boxes wrapped in fabric ($5) - Hidden but effective
Floating shelves ($15-30) - Lean against tent poles
Upside-down buckets with fabric draped over
Small Investment Options ($30-80):
Wire grid walls/pegboards - Versatile and reusable
Acrylic risers - Clean, modern look
Tiered display stands - Purpose-built for products
Wooden ladder display - Lean against back of booth
Creating Visual Depth (Not Just Height)
Layering technique - Front to back:
Front layer: Small attention-grabbers or samples (12-18 inches from edge)
Middle layer: Your main product display (center of table)
Back layer: Larger items, signage, or backdrop (back 6-12 inches)
Why this works:
Eye naturally travels from front to back
Creates intrigue that draws customers closer
Shows multiple products without overwhelming
Gives customers a reason to step into your booth
The Rule of Odds
Display products in groups of 3, 5, or 7—never even numbers.
Why?
Odd numbers are more visually interesting
Even numbers feel too symmetrical (boring)
Three is the magic number for product groupings
Example: Instead of displaying 4 candles in a row, display 3 or 5.
Product Plug: Banners & Signage
Your business name should be visible from at least 15-20 feet away.
Without proper signage:
Customers don't know what you sell
You're just "a booth" not a brand
Repeat customers can't find you
No brand recognition builds over time
Two signage options:
Retractable Banner Stand ($80-150)
Professional and portable
Sets up in 30 seconds
Lasts for years
Can be used at multiple events
A-Frame Sign ($50-100)
Great for corners or outside booth
Directs foot traffic
Weather-resistant
Can display "specials" or "samples inside"
💡 Shop coordinated booth signage: Retractable Banners | A-Frame Signs | Custom Booth Kits
Signage pro tip: Your business name should be the largest text. What you sell should be second largest. Everything else is supporting detail.
Section 3: Cohesive Color Stories That Sell
Random colors = forgettable booth. Intentional color palette = instant brand recognition.
The Power of Color Consistency
Why color matters more than you think:
When you use the same 2-3 colors consistently across:
Table coverings
Signage
Price tags
Business cards
Packaging
Your clothing
Something magical happens: Customers start recognizing you from across the market. "Oh, that's the blue stripe bakery!" or "There's the sage green soap lady!"
This recognition = trust = sales.
Choosing Your Color Palette
Start with 2-3 core colors maximum:
Color 1: Your dominant brand color (60% of your visual space) Color 2: Your complementary color (30% of your visual space)
Color 3 (optional): Your accent color (10% - used sparingly for pops)
Color psychology for different businesses:
For bakeries and food products:
French Countryside: Soft blue + cream + gold touches
Rustic Artisan: Warm brown + cream + sage green
Modern Bakery: Black + white + one bold accent
For handmade goods and crafts:
Natural & Organic: Sage green + sand + white
Bohemian: Terracotta + cream + dusty rose
Contemporary: Charcoal + blush + white
For beauty and wellness:
Spa Vibes: Soft gray + white + eucalyptus green
Feminine Luxury: Blush + cream + gold
Modern Clean: White + black + one plant-based green
Creating Your Color Story
Your color palette should appear in:
Table setup - Runner, cloth, or covering
Signage - Main banner, price tags, informational signs
Packaging - Bags, boxes, tissue paper, stickers
Marketing materials - Business cards, thank you cards
Product labels - Consistent across all items
Your outfit - Wear your brand colors (apron, shirt, etc.)
The consistency test: If someone took a photo of just one element (a business card, a shopping bag, your sign), would they know it belongs to your brand?
Avoiding Color Mistakes
❌ Don't:
Use every color of the rainbow
Change colors every season (confuses recognition)
Pick trendy colors that don't match your products
Use colors that clash with your actual products
Forget about how colors photograph (Instagram matters!)
✓ Do:
Commit to your palette for at least 2-3 years
Choose colors that complement your products
Consider your market's overall vibe (blend in just enough to stand out)
Test colors together before buying everything
Document your exact color codes (hex, RGB, CMYK)
The Matching Set Strategy
Here's where small businesses often fail: They piece together their booth from different sources, resulting in 5 different shades of "blue" that don't actually match.
The solution: Design families—coordinated products that were made to work together.
What a cohesive set includes:
Table runner or tablecloth
Main business banner
Price signs and holders
Business cards
Thank you cards
Shopping bags or packaging
Product labels
When everything matches, you look 10x more professional—even if your budget was modest.
Section 4: Professional Branding on a Budget
You don't need thousands of dollars to look established. You need strategic spending.
The $500 Professional Booth Breakdown
Here's exactly where to allocate a modest budget for maximum impact:
Must-Have Essentials ($250-300):
Canopy tent: $100-150
Tent weights: $30-50
Tables (if not provided): $60-80
Branded table runner: $40-60
Business cards (250): $25-40
Visual Impact Upgrades ($150-200):
Retractable banner with logo: $80-120
Coordinating price signs: $30-40
Thank you cards (100): $20-30
Branded shopping bags: $40-60
Total: ~$500 for a complete professional setup
Where to Splurge vs. Save
Worth spending more on:
✓ Your main business sign (customers see this first)
✓ Table covering (foundation of your visual brand)
✓ Tent weights (safety and professionalism)
✓ Business cards (you'll hand out hundreds)
Where you can save:
$ Display risers (DIY with crates)
$ Decorative props (thrift stores, home goods)
$ Product containers (baskets from discount stores)
$ Under-table storage (repurpose bins you own)
The Payback Period Mindset
Smart vendors think in ROI, not cost:
Example:
Investment in professional booth branding: $500
Average sales increase per market: $150 (from $200 to $350)
Payback period: 3-4 markets
Good booth equipment lasts 3-5+ years and pays for itself quickly. After the initial investment, it's pure profit generation.
DIY vs. Buy: What's Worth Your Time?
Worth DIYing:
Display risers from crates
Fabric-covered boxes for height
Simple price tags (if you have design skills)
Table skirts (if you can sew)
Worth buying professionally:
Main business signage (DIY often looks DIY)
Business cards (too important to mess up)
Branded materials (consistency matters)
Tent and weights (safety critical)
The rule: If you'll use it 20+ times and customers see it, buy it professionally. If it's hidden or temporary, DIY is fine.
Starting Minimal, Upgrading Strategic
Phase 1: First 3 Markets ($250-350) Focus on: Basic setup, one branded element (table runner or banner), business cards
Phase 2: Markets 4-8 ($150-250 additional) Add: Complete signage, branded packaging, thank you cards
Phase 3: Established Vendor ($200-400 additional) Add: Advanced displays, lighting, specialty elements
Let your revenue fund your growth. Don't go into debt for booth setup.
Product Plug: Budget-Friendly Branding Essentials
You need these three things before anything else:
1. Business Cards Your most important marketing tool. You'll hand out 20-50 per market.
Must include: Business name, what you sell, contact info
Should match: Your booth colors and overall aesthetic
Budget: $25-50 for 250 cards
2. Price Signs: No prices = No sales. Customers won't ask—they'll just walk away.
Must be: Clear, readable from 3-4 feet away
Should match: Your brand colors and fonts
Budget: $20-40 for a complete set
3. Shopping Bags Your products leave in these—they're mobile advertisements.
Must have: Your business name and social media
Should be: Coordinated with your brand colors
Budget: $40-80 for 100-200 bags
💡Budget tip: Start with these three, then add one new branded element each month as sales allow.
Section 5: The Power of First Impressions
You have 3 seconds. Make them count.
What Customers Actually See (The Science)
Eye-tracking studies of farmers market shoppers reveal:
First 1 second: Overall color and visual appeal Seconds 2-3: Main sign, product type, vendor approachability Seconds 4-5: Specific products, pricing, details
If they're not interested in the first 3 seconds, they keep walking.
The First Impression Checklist
From 20 feet away, can customers instantly tell:
What you sell? (sign must be clear)
Your business name? (visible signage)
That you're open and welcoming? (body language)
From 10 feet away, can they see:
Product variety and options?
That it looks professional and established?
Pricing or price range?
When they reach your booth, do they experience:
Friendly greeting (not aggressive, not ignored)?
Ability to browse without feeling pressured?
Clean, organized display?
Easy way to ask questions?
The Welcome Sequence
How to greet customers without being pushy:
Step 1: Eye contact + smile (as they approach)
Step 2: Verbal greeting (when they stop)
Good: "Good morning! Feel free to look around."
Bad: "Can I help you find something?" (too sales-y)
Bad: Saying nothing (looks disinterested)
Step 3: Give space (step slightly back)
Let them browse for 15-30 seconds
Straighten displays, but stay available
Watch for engagement signals
Step 4: Engage when ready (they pick something up or make eye contact)
Answer questions enthusiastically
Share brief product story
Suggest complementary items
Step 5: Easy checkout
Make payment quick and simple
Include business card in bag
Thank them genuinely
Invite them back
The Booth Atmosphere Factors
Beyond visuals, customers sense:
Your energy:
Standing vs. sitting (standing = engaged)
Smiling vs. neutral face (friendly = approachable)
Focused on customers vs. on phone (respectful = professional)
Your organization:
Clean displays vs. messy (organized = trustworthy)
Stocked products vs. sparse (abundant = successful)
Everything has a place vs. chaotic (professional = quality)
Your presence:
Dressed intentionally vs. sloppy (effort = pride in business)
Wearing brand colors vs. random (cohesive = established)
Name tag or branded apron vs. nothing (accessible = approachable)
Creating "Stickiness"
Why some booths have lines while others don't:
Elements that make customers linger:
Samples (for food products - creates obligation reciprocity)
Something unique or unusual (conversation starter)
Demonstration or activity (pottery wheel, live calligraphy)
Beautiful displays worth photographing
Friendly vendor they want to talk to
The social proof effect: When customers see a crowd at your booth, they're more likely to stop. Early morning sales are critical for creating this momentum.
The Memorable Exit
Don't let the sale be the end of the relationship:
Include in every purchase:
Business card with social media
When/where you'll be at next market
Genuine thank you (use their name if possible)
Invitation to follow online
Optional but effective:
Thank you card with first purchase
Small sample of another product
Discount code for next purchase
QR code to email list signup
The goal: Turn first-time buyers into repeat customers and word-of-mouth promoters.
Bonus Section: Your Pre-Market Checklist
Print this and check off before every market:
The Night Before
Check weather forecast (prepare for rain/wind)
Pack emergency kit (tape, ties, towels, first aid)
Charge phone and any electronics
Get change for cash box ($100-150 in small bills)
Load vehicle with all booth equipment
Prepare products and inventory
Set multiple alarms
Get good sleep!
Morning Setup (Arrive Early!)
Set up tent FIRST and weight immediately
Position tables in open layout
Add table coverings and secure from wind
Install main business sign/banner
Arrange products working back to front
Add price signs to all products
Set out business cards and marketing materials
Do final walk-around from customer perspective
Take a photo of setup (track what works)
During Market
Greet customers warmly but not aggressively
Restock front-facing products regularly
Keep displays tidy and organized
Collect email addresses when possible
Note what's selling and what's not
Stay standing during busy periods
Hydrate and take care of yourself
Breakdown
Pack products carefully (prevent damage)
Count cash and record total sales
Collect all signage and materials
Thank neighboring vendors
Leave space clean
Secure tent and equipment for transport
Load up your cart
After Market (Don't Skip This!)
Record sales by product
Note customer feedback and requests
Follow up on any wholesale inquiries
Post photos to social media
Thank customers who tagged you
Review what worked and what didn't (super important to get better at this each time)
Plan improvements for next market
Common Booth Mistakes to Avoid
Learn from others' expensive errors:
Mistake #1: The Fortress Layout
Problem: Tables block customers from approaching Fix: Create angles, stay approachable, step forward to greet
Mistake #2: No Proper Tent Weights
Problem: Wind destroys booth, damages products, looks unprofessional Fix: Minimum 40 lbs of weight, secured with bungee cords
Mistake #3: Invisible or Confusing Signage
Problem: Customers can't tell what you sell or what things cost Fix: Clear main sign visible from 15+ feet, prices on everything
Mistake #4: Mismatched Branding
Problem: Random colors, different fonts, no cohesive look Fix: Choose 2-3 colors, use consistently across everything
Mistake #5: Sitting the Whole Time
Problem: Looks disengaged, unapproachable, unprofessional Fix: Stand during busy times, make eye contact, greet actively
Mistake #6: Flat, Boring Displays
Problem: Everything same height, no visual interest, blends in Fix: Use risers, create levels, add vertical elements
Mistake #7: Pricing Too Low
Problem: Can't afford improvements, undervalue your work Fix: Price for profit; farmers market customers expect quality pricing
Your First Market Action Plan
4 Weeks Before:
Decide on brand colors (2-3 colors maximum)
Order business cards and main signage
Purchase or reserve booth essentials
Practice booth setup at home
2 Weeks Before:
Create coordinated price signs
Prepare inventory and packaging
Test your setup and refine layout
Get cash for change
1 Week Before:
Confirm market details and arrival time
Check weather forecast
Pack emergency supplies
Create setup checklist
Day Of:
Arrive early (setup time matters)
Set up tent and weights FIRST
Follow your practiced layout
Take a deep breath—you've got this!
Ready to Build Your Professional Booth?
Your products deserve professional presentation.
Stop looking like a beginner and start attracting the customers your business deserves. With cohesive branding, strategic layout, and attention to first impressions, your farmers market booth can compete with vendors who've been doing this for years.
Shop coordinated booth branding:
→ Browse Complete Vendor Kits → French Countryside Collection → Modern Minimalist Collection → Warm Artisan Collection
Not sure which style fits your brand? Take our 2-Minute Booth Style Quiz
Related Resources You'll Love:
My Benable recommendations: Event Branding Essentials for Small Business Vendors & Creatives
50+ Farmers Market Booth Ideas That Actually Increase Sales (coming soon)
Questions about setting up your farmers market booth? Drop a comment below—I love helping vendors create booths that sell!
📌 Save this guide! Pin it to your business board and reference it before every market.